Home-Made Granola Bars

Tags

, ,

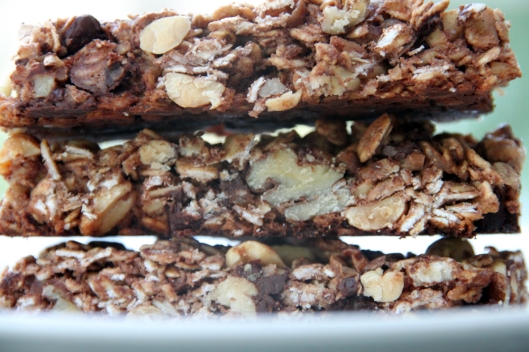
I’ve been wanting to share this recipe with you for a while. If you don’t already make your own granola bars, you may want to add it to your 2016 resolutions. These bars are delicious, and they are loaded with vitamins, minerals, fiber, protein, antioxidants, omega-3 fatty acids, and more. Plus, they are home made, which means they are free from any preservatives meant to keep food edible on a store shelf for months if not years, and they do not contain any artificial agents that leave an aftertaste or an artificial flavor. And finally, this recipe has a fourth or less of the amount of sugar normally found in commercial granola bars. Every time I pack these in my children’s lunch boxes, I feel I am doing something good in the world.

Untitled-1

This recipe makes about 30 bars.

  • 3 cups of rolled oats (you can substitute 1/4 cup with wheat germ).
  • 2 cups of coarsely chopped nuts of your choice (almonds, pecans, cashews, peanuts, hazelnut, etc.). No need to roast them. Salted peanuts are ok, they can even add a great flavor to the mix.
  • 1 cup of seeds of your choice (sesame, hemp, chia, pumpkin, sunflower, flax, etc.).
  • 1 cup of dark or semi-sweet chocolate chips (If you like, you can also substitute 1/2 cup with dried fruit such as coconut, raisins, cherries, cranberry, dates, etc.).
  • 1/4 cup of flour (whole wheat or all purpose)
  • 1 tsp. cinnamon, 1/2 tsp. ground ginger, and 1/2 tsp. all spice or nutmeg.
  • 4 large or 5 regular egg-whites.
  • 1/4 cup of canola oil or a nut oil of your choice or melted butter.
  • 3/4 cup of light brown sugar. You can substitute 1/4 cup with honey.

The recipe is very simple. Once you have all you ingredients on your kitchen table, you need a half sheet pan lined with parchment paper, and two containers: a small one to beat the egg whites, and a big one (I use my 7 qt. mixing bowl) for everything else.

blogbar

Preheat the oven at 350°F. In the big container, dump all your dry ingredients (oats, nuts, seeds, dried fruit, chocolate chips, flour, and spice) and give them a good toss. Then add the fat (the oil or butter). The fat is key because it brings moisture to the granola bar. Mix everything with a big spoon so that the fat coats all your ingredients. Now, in the smaller bowl, beat your egg whites with a whisk for about 1 minute until they become foamy. If you continue beating after this point, the egg whites will thicken, become opaque, and you might end up with a meringue. What we are looking for is a liquid to glue all your ingredients together. Combine the egg whites with the mix, then add your sugar. Mix well one last time.

Spread your mixture over your prepared baking sheet so as to cover the surface evenly. Try to form a rectangular shape about 1/2-inch thick. You can use another piece of parchment paper to smooth the top.

granola4

Bake for 35 minutes. Then remove from the oven and let rest on the parchment paper for at least 30 minutes before you start cutting them into bars.

IMG_8438

When your granola bars are completely cooled, you can store them in an airtight container, separating layers with wax paper or pieces of the parchment paper you used in the baking.

IMG_8434

I hope you will try this recipe. Thank you for reading my blog. I wish you a happy and a healthy New Year!


Madeleines

Tags

, , ,

All kids love these sweet scented cakey cookies called madeleines. But you might be surprised how much they’ll love them if you make them with vegetables. Healthy and delicious, that’s the best.

Untitled-1

Madeleines are traditionally made with lemon zest. For a veggie version, the recipe is the same, just omit the lemon zest and use instead grated beets, raw or roasted, or spinach cooked, well drained, and finely chopped or pureed for a homogeneous color. These veggies give madeleines nice flavors and beautiful non-artificial colors that the French, I discovered this summer, also use to dye their cheeses.

IMG_9979

IMG_9976
IMG_9977
Untitled-3

IMG_9975

Their are few things to know and do before you start making this recipe:

  • To obtain that nice bump that characterizes madeleines, you need to refrigerate the batter at least two hours prior to baking. It can stay refrigerated for up to 48 hours.
  • Once you butter and flour the madeleines tray, freeze it until needed.
  • Because of the intricate shape of the molds in the tray, you absolutely need a brush in order to coat all the parts properly.
  • If you are making the classic madeleines with lemon, to get the maximum aroma from the lemon oils, rub the zest against the sugar using the palms of your hands and your fingertips until the sugar absorbs all the flavor.

Untitled-5

Ingredients:

  • 6 Tablespoons of butter, melted and cooled slightly, plus a tiny bit extra for greasing the tray
  • 1/2 cup of sugar
  • Zest of one lemon finely grated (for the classic madeleines)
  • 2 eggs at room temperature
  • 1 Teaspoon vanilla
  • 2/3 cup all-purpose flour, plus extra for dusting
  • 3/4 Teaspoon of baking powder
  • 1 medium skinned raw beet, or oven roasted (Oven roasted root vegetables have a deeper and sweeter flavor), OR 1/2 cup of spinach, boiled and well drained, or 1 cup of finely chopped raw spinach.
  • Powdered sugar for dusting (optional)

Untitled-4

Steps:

Brush the madeleines molds with melted butter, then shake in a little flour to coat, tapping out the excess. Freeze the pan until baking time.

In a bowl, mix the flour, baking soda, and salt. Set aside.

In another bowl, beat the sugar and the eggs until they become lighter in color and volume, about two minutes. Then add the vanilla.

If you are making vegetable madeleines with a vegetable puree, then this is the time to mix in the puree. If you are using grated or chopped raw vegetables, then hold on to them and add them at the end. Fold in the dry ingredients – the flour previously mixed with the baking soda and salt until combined with the wet ingredients. Then pour in the melted butter and mix everything gently until smooth.

Now you have two options, you can cover the bowl and refrigerate at least two hours, or bring the madeleines tray out from the freezer, fill in the molds, cover with plastic, and then refrigerate for at least two hours.

When you are ready to bake, preheat the oven to 375°F. Remove the madeleines tray from the fridge and pop it into the oven. Or, if you have refrigerated just the batter, remove the tray from the freezer, and scoop out about one tablespoon of the batter in the center of each mold of the madeleines tray. Don’t try to smooth it out, it will settle into the shape of the mold in the oven. If you have some batter left, you can use it in a mini-muffin pan.

Bake for about 10 minutes or until you see that the edges are golden brown. At this point, if you touch the madeleines bump, it shouldn’t sink but it shouldn’t be dry either.

madeleine

As soon as the tray is out from the oven, tap it against the working space. The madeleines will fall out without too much trouble. You can use a wooden pick to help, otherwise. Then immediately place them on a wire rack, bump up, until they cool down completely. Once cooled, if you wish, you can dust them with powdered sugar.

Madeleines dry out quickly, so serve them right away or keep them in a glass jar until the kids come back from school.

https://www.facebook.com/sillyapron/

Clafoutis

Tags

, , ,

One of my summer jobs as a student in France was picking cherries. It was an unexpected opportunity that a cousin I was visiting offered me. He was the head cook in a traditional French restaurant and knew a farmer well. I lived with the farmer and his wife for a week in a big stone house perched in the mountains and valleys of the Luberon region in southern France. I shared with them one meal a day from their land. I woke up with the roosters and collapsed with the sun. The entire day, I sat on tree branches along with Catalan workers who lived there with their families, picking the best cherries and filling bucket after bucket. I never really understood why we were laughing and giggling the entire time. I suspect a certain amount of alcohol in the cherries made its way into our mouths instead of the buckets, and exposure to the sun must have had some effect. Anyways, it was a great time, cherries will always make me smile.

Untitled-7

Cherries are one of those fruit, like peaches, that are naturally sweet and juicy. It takes determination not to enjoy them right away and to save them for a baking project. Unless cooking transforms them into something completely new, like oranges with marmalade, I think it’s better to savor cherries how nature offers them. But clafoutis does transform them.

Untitled-4

Clafoutis is a traditional French baked dessert from the Limousin region that truly honors cherries. Cherries are placed in a buttered baking pan (with their pits intact) and a simple pancake-like batter is poured over them, then they go to the oven. No crust to make or chill, no pitting, no mess. The baking process keeps the cherries whole, and the pits release a slightly bitter and nutty flavor that gives the authentic clafoutis its taste.

Untitled-1

I tried many clafoutis recipes until I reached the taste I was looking for. The difference between the recipes is basically in the batter, which leans either toward a flan, a custard, or a cake. My recipe is the perfect balance.

Ingredients:

1 pound Cherries

2 Eggs

1/4 cup Sugar

1/3 cup Whipping Cream

1/4 cup Flour

1/3 cup Milk

2 tablespoons Butter (melted and still warm)

1 Lemon Zest

Butter the baking dish (I use one 9-inch round dish, six 2½-inch small ramekins, or four 4-inch crème brulée ramekins) and sprinkle with flour (or even better, sugar for caramelization). Place inside the cherries, previously washed and the stems removed, tightly packed one next to another without leaving any space empty.

IMG_8284

To make the batter, beat the eggs and sugar together for a minute, then incorporate the cream. Add the flour until well combined, then add the milk, butter, and lemon zest. Mix well. Then pour the batter carefully next to the cherries until the baking dish is almost full but can still be carried to the oven without spills. Bake for 40 to 50 minutes at 350°F until the top is puffy and golden.

IMG_8280

Clafoutis is best served warm, but it’s also good straight from the refrigerator the next day. Vanilla-flavored whipped cream is undoubtedly a heavenly finish to the dish, or a sprinkle of icing sugar. I hope you will try clafoutis before it’s too late in the season.

IMG_7711

Painted Cakes

Tags

,

I never thought that my education in Fine Arts in Aix-en-Provence, France, could one day be useful in the food business here in the US. The visual aspect of food – the composition, the construction, the creative transformation – follows the principles common to all visual arts. But being able to hold a brush, mix colors, and trace lines on food is still surreal to me. Cake painting is one of my favorite things to do in the kitchen, and I enjoy it even more when the theme is inspired by a picture book.

2014-10-26%2520Gunyan%2520100.-3658287476-O

Once, I was asked to design a cake for a one-year-old girl. The cake I created had candied oranges, cardamom and orange blossom syrup, and it was inspired by the little girl’s favorite picture book that is shaped like a train. When you flip the pages, you move from one car to the next, like a passenger discovering the bright, colorful, and happy faces in the train along a journey.

Untitled-10

When I arrived to deliver the dessert, I had the impression that I was entering into the book’s world. There was an Indian food truck with bright doodles all over it, colorful tablecloths like the train cars of the book, large bowls of fresh, round oranges dotting the landscape, and of course, beautiful smiling faces everywhere. My cake was where it belonged.

IMG_3402

IMG_3406

IMG_3416

IMG_3420IMG_3424

IMG_3421

2014-10-26%2520Gunyan%2520622.-3658310204-O

Quince: A Love Story

Tags

, , , , , ,

At first sight, you could easily mistake it for a sweet apple or a soft pear, but it’s a tough thing. There is an irresistible floral fragrance, but if you dare to bite it, you’ll be left with an awful raw bitterness. You have to be patient with the quince. It needs special treatment to let go of its harsh façade and slowly reveal its full essence and beauty. With the quince, it’s a love story.

Untitled-2

The quince, not the apple, is the fruit that Eve used to seduce Adam in the Garden of Eden. The quince is the fruit that brides chose to perfume their kisses at wedding ceremonies in Ancient Greece. It is the fruit behind the exquisite delicacy called ‘Romeo & Juliette’ in the Spanish-speaking world. And yes, the quince is my Valentine’s treat.

Untitled-3

In Morocco, the quince is abundant, but it is always cooked one way, in a succulent tajine with lamb, saffron, and cinnamon. Not very far from Morocco, in Spain and Portugal, the quince is prepared in completely different ways, to make delicious jellies and paste (membrillo).

Untitled-4

I recently discovered in a great food blog, Fae’s Twist & Tango, another interesting use for quince. It is a Persian recipe for quince preserves with cardamom and rose water. I had to try it!

Untitled-3

The quince is a Fall fruit and isn’t easy to find this time of the year, but our local Persian store manages to keep it available, fresh, and fragrant… if pricy. The original recipe calls for rose water, and I added some tiny dry roses that I brought from Morocco during my last trip. They are called ward beldi, which means roses from the countryside. Women grind them and mix them to make natural soap, sabon beldi. I like to put dry roses in tea infusions with some honey. One sip and I’m back in the sweet homeland.

Untitled-5

For this recipe, you could use as many quinces as you like. My recipe has a single quince and will yield two 6 oz. jars, but you can multiply the recipe with no problem:

Ingredients:

1 large quince
1 cup granulated sugar
2 cups water
1 sachet, made of 5 cardamom pods crushed
1 sachet, made of quince seeds (high in pectin)
½ teaspoon of rose water and/or edible roses
1 teaspoon lemon juice

IMG_4270

Steps:

Peel the quince, cut it into quarters, then slice each quarter in half. Cut out the stems and cores, but keep the seeds and put them in a sachet.
Put the quince wedges into a large saucepan and add cold water, then add the sachet of seeds.
Bring to a boil, reduce the heat, cover the saucepan, and let cook for 1 hour.
Uncover the saucepan. The quince edges should have turned pink. Add the lemon juice and sprinkle one cup of sugar all over. Turn up the heat to bring to a boil, then reduce the heat and let the saucepan simmer covered for 1 hour.
Uncover the saucepan again. The quince edges should now be burnt orange in color. Turn off the heat, then add the cardamom sachet and the rose water. Let the saucepan sit for 15 minutes to diffuse the flavors, then remove both sachets and discard them.
Gently spoon out the cooked quince wedges and place into jars. Add one cardamom pod and one or two dry roses (optional) in each jar. I like to strain the syrup before I then pour it into the jars, filling them. Cover the jars and let them cool before refrigerating.

IMG_4305

I find it better to wait until the next day to enjoy, so that the flavors can set and the syrup has a chance to thicken. Quince preserves are great eaten directly from the jar, or with cheese (Manchego) and bread. The remaining syrup can be used as a sweetener for tea and smoothies, and can add a great flavor to salad dressings. It can also be used to brush home-made fruit tarts, especially apple or pear. Yum!

Thank you Fae, and Happy Valentine’s Day to all my readers!

If this is your first time here, thank you for visiting! If you want to see more of my work, please “Like” my facebook page where I post regularly about food https://www.facebook.com/sillyapron/

My Best Edible Gift

IMG_3984

I am not a fan of North African cookies. I find them too sticky, too sweet, or too rich. But there is one exception. They are diamond-shaped cookies, well balanced in flavor and texture and fragrant with vanilla and orange blossom water. They taste delicious thanks to almond flour. Covered with powdered sugar, they have a wintery look that makes them a perfect gift at this time of the year.

Untitled-6

They are called makrout a’luz, and they are originally from Algeria. They remind me of cookies that my mom, who is originally from Oujda, at the Moroccan border with Algeria, used to make. We used to take them uncooked to the neighborhood wood oven early in the afternoon on our way to school, and we’d pick them up after school.

Untitled-3

The communal oven is called ferran in Arabic, and it offers baking only as a service. People bring their uncooked bread, cookies, and sometimes fish, chicken, and big portions of meat, like half a sheep, to the ferran, and they come back to pick up their food later on in the day. It’s an ancient practice, and I am happy that neither the presence of French bakeries nor the introduction of modern ovens into homes has extinguished this tradition. Click here to see another example from a previous post.

IMG_3969

You would be surprised how easy it is to make makrout a’luz. This is what you need for about 45 (1” x 1/2”) cookies. Watch this recipe with Albarock

For the dough

  • 2 cup almond meal flour (Bob’s Red Mill available at Whole Foods or Safeway, but cheaper online)
  • 3/4 cup confectioner sugar (also called powdered sugar or icing sugar)
  • 1 large egg
  • Lemon zest from 1 organic lemon
  • 1 tablespoon orange flower water (available at Whole Foods)
  • 1/4 cup flour for dusting

 For the syrup

  • 2 cup of water
  • 1 cup of granulated sugar
  • 2 tablespoons orange flower water
  • 1 teaspoon vanilla extract (or half a vanilla bean)

 For finishing

  • 2 cup confectioner sugar

IMG_3912

Preheat your oven to 325° F. In a large bowl, use your hands to mix all the dough ingredients together to form a ball, then divide it into 3 small balls.

IMG_3935

Flour your surface so the dough doesn’t stick, and roll out each small ball into the shape of a thin log. You can decide for the thickness of the log, but I like it not too thick, in order to allow a perfect balance between the outside crispiness and the inside moisture of the cookie (I use my index finger as a measurement reference). With a sharp knife, cut the log diagonally to form 1” diamond shapes.

IMG_3943

Line a baking sheet with parchment paper and place the cookies on it, without leaving much space between them, as they don’t expand. Place the sheet on the middle oven rack and bake for 15 minutes.

IMG_3950

Meanwhile, prepare the syrup. Bring the water and sugar to a boil. Turn off the heat and add the vanilla and the orange water. The syrup needs to still be hot when used.

IMG_3960

Now prepare your work space. Place the syrup pan near a bowl with a drainer, followed by a bowl with powdered sugar, and a large plate or empty space on your work table. Organization is important here because you will need to work quickly.

IMG_1104

Bring out the cookie sheet and turn off your oven. Start with only 10 cookies. Soak them in the syrup using a perforated spoon, then quickly place them on the drainer, then in the bowl of sugar (delicately covering them with sugar using both hands), and then place them on your plate or space without overlapping them. Do this about 4 times until you are done with all the cookies.

IMG_3983

About 5 minutes later, when the cookies have cooled down a bit, return them in the bowl of powdered sugar for a second coating. Let the cookies sit for 30 minutes until they are completely cool. Then place them in small gift bags or preserve them in a tin container, if you have one. I use a baking pan and cover it with aluminum foil. You can keep your makrout a’luz hidden there for as long as a week, if you’re lucky!

IMG_3966
Please like Silly Apron on facebook. Thank you…

Farewell Dish

Tags

, , , , ,

When one season comes, another one goes. It’s obvious, but we barely pay attention to the end of seasons, while our interest switches to the new one. We welcome new bounties – many of us have already been celebrating Fall flavors with spices, pumpkins, and apple treats – but we forget to pause, to meditate about Summer’s wealth that overflows on our dining tables. That’s one reason why I love to go to the market.

gourgette5

Last week felt like a farewell party. Every farmer I stopped by pointed out that I was holding the last vegetable from Summer’s harvest. It wasn’t sad, but it also wasn’t neutral.

gourgette4

So I would like to share with you my final Summer dish: zucchine alla scapece in Italian, or marinated fried zucchini in English. All you need is 1 cup of vegetable oil (for frying), 3 small zucchinis, 1/3 cup of white wine vinegar, 1/3 cup fresh basil (thinly sliced), 1 garlic clove (sliced), salt and pepper, and red pepper flakes.

gourgette3

I discovered this recipe in Michael White’s cookbook Classico E Moderno. It’s an interpretation of a Spanish way of preparing fish called escabeche, where fish is first fried and then marinated. The idea is that very hot fried fish or zucchini can absorb the flavorful marinade while at the same time keeping its shape, since crispy fried foods don’t easily fall apart, even when placed in liquid.

Untitled-1

Zucchine alla scapece is very simple to make. Slice the zucchinis and fry them in the hot oil. Once they turn golden (after about 3 minutes), drain them on paper towels to get rid of excess oil, then transfer them to a bowl. While the fried slices are still hot, drench them in the white wine vinegar, add the basil, garlic, salt, pepper, and red pepper flakes, and gently toss everything together. It’s best to let the whole thing sit a few hours or even overnight, if you have the time, before serving.

gourgette2

The last time I made zucchine alla scapece, I used fresh garlic we pulled from our garden just before making the marinade. Garlic is easy to grow and requires no maintenance. You just stick in the ground any garlic cloves that get a bit too old to use in cooking and forget about them. Then one day, when you notice something green growing, you remember!

aie

We tried companion planting this year. We planted garlic close to our rose bush. Companion planting means placing together plants that help one another – in this case, garlic is supposed to protect the rose from pests. A harsh winter last year meant our rose bush hardly blossomed this year, so we missed the beautiful perfumed roses and didn’t witness many benefits of companion planting. We did, however, have a lot of garlic, all fresh and fragrant (hmm… maybe the garlic benefited from the rose after all!).

aie2

I use the tops of the garlic’s green stems, which have a milder garlic flavor and are great in salads or as garnish. Another wonderful summer gift we’ve appreciated this year.

aie4

In a couple weeks, it will be time to remember to be thankful. I know what I’ll be thankful for. Do you?

Healthy & Sweet

Tags

, , , , , ,

I haven’t had a chance yet to call the dentist’s office for my son’s cavity, but I did buy bags of candies for Trick-or-Treating! Is something wrong here?

framboise

I don’t know if you are like me, but I am very uneasy with this whole candy business. Not because I am against candies, but kids have so many occasions where candies are offered to them: birthday parties, class parties, school celebrations, banks and other offices, restaurants, community events, and even play dates!

framboise2

It was my son’s birthday party at school earlier this month. He was celebrating with a classmate whose mom volunteered to bring cupcakes. I didn’t want to bring candies or more cake, but I also sensed that my son was expecting something different from the healthy snacks we contribute monthly to his class.

classe

And since only store-bought food is allowed, I tried chocolate chip stuffed raspberries from Sweet Paul. It is an elegant snack, healthy and sweet, that is also easy and quick to put together. You just stuff the inside of raspberries with chocolate chips, and everyone is happy!

school1

By the way, I learned recently that they use to give apples to kids on Halloween! Can this tradition come back, please!? Or wouldn’t it be great if we could find some sort of balance, like the chocolate chips stuffed into raspberries? I would love to hear your thoughts!

Birthday Boy

Tags

, , , , , ,

He knew exactly what he wanted: a two-tiered cake with lemon and strawberry flavored layers separated by vanilla frosting and raspberries, topped with a spider weaving his web. Of course!

dessin

Believe me, this “order” is a piece of cake compared to prior ones, like the three-tiered snake cake! Plus it’s a healthy cake, so to speak. It has no food coloring, no artificial flavoring, no fat in the sponge cake, and even no chemical leavening. The cake is called génoise, and it gets its fat from egg yolks, its volume from beating the eggs, its moisture from a home-made strawberry syrup, and its flavors from raspberries, lemon zest, and vanilla beans. It is a light cake and absolutely delicious!

s&a1

The only butter is in the buttercream icing that coats the cake. The filling is made with whipped cream, which is much lighter, and you can always make more in a flash if you run out.

s&a2

Finally, decorating the cake with icing is so forgiving! It’s a great way to practice with royal icing if you are new to cake or cookie decorating. It’s also fun to do with kids, because it can’t go wrong and you can always take it from where they left off.

s&a3

Of course, the spider web could be done neatly, but I find a messy web just fine, aesthetically.

cake

pieceofcake

It’s funny how a few simple ingredients can create so much happiness! But to be fair, I have to say that I am lucky to live in an area with the best cake supply store. The Little Bitts Shop is a family-owned business with more than 35 years of experience in cake baking and decorating, and Bob and Ann provide the complete package, from supplies to customer service. They always help me fill even the most exacting – and unusual – of orders!

Ratatouille

Tags

BW2

Ratatouille is not known as a chichi French dish. Rather, it’s a rustic, working-class vegetable stew you normally wouldn’t dream of taking to a French White Dinner Potluck in Chevy Chase, one of the richest neighborhoods in the Washington DC region, tout simplement because French dining is meant to reflect class! (sorry about bad iPhone image quality)

BW3

But today, French refinement has inspired and even defined the style of some great American chefs. Thomas Keller, named Best Chef in America in 1997, transformed the disheveled French ratatouille into a dish presented in true French style – hearty but elegant.

ratatouille-thomas-keller

It all started when Keller was approached by Brad Bird, director of animated film Ratatouille.  Bird challenged the chef to invent an appetizing ratatouille dish that could be generated by a computer and cooked by a rat! 

460fcbd9f916f7adeb158a51af1e6d51_ratatouille6

Keller responded by challenging Bird and his team to immerse themselves in French cuisine, in order to make the most authentic animated movie about food possible.

kitchen062

They took cooking classes, consulted with food experts, interned in Keller’s professional kitchen, and dined in high end restaurants in Paris.  

ratatouille

The results of the exchange are remarkable: an Academy Award–winning film and a delightful ratatouille recipe, one that managed to charm more than a few French guests at the recent White Dinner.

BW1

With all the work that went into creating Ratatouille, you might think Keller’s ratatouille would be difficult and expensive to make. Quite the opposite. You’ll be surprised how simple, economical, and convenient it is. Here is the link I used for the recipe:  http://www.justasdelish.com/ratatouilles-ratatouile-confit-byaldi/.